Creating Detailed Packages with the CQ Deploy Plugin
Published on by Dan Klco
Sometimes you may want to create a package with more descriptive information than the CQ Deploy Plugin provides out of the box. You may want to customize the group or add a description or even add dependencies. This article shows you how to include Package Metadata into your package and how to deploy the package with the CQ deploy plugin.
Updating the Package
In order to do this, first install the package into CQ and update it as you desire.
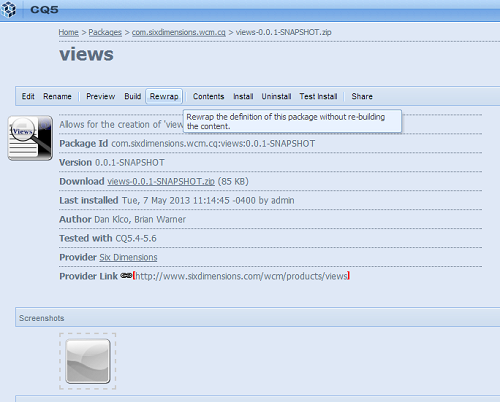 Updating a package in CQ 5.4
Once you have completed your updates, select Rewrap to update the package configuration and then download the package.
Updating the Configuration
Once you have the package downloaded, extract the META-INF folder from the root of the package. Copy the contents of this folder into your project into the folder being used to hold your package configuration. Generally this will be {PACKAGE_PROJECT}/src/main/resources
Before you commit anything, go ahead and remove any transient information (e.g. anything with timestamps or users). This information will not be correct when you upload the package next time, so there really is no reason to keep it. You can also delete the thumbnail folder under META-INF/vault/definition as this will be recreated based on the thumbnail.png file you provide, if any.
Once you have removed all of the transient information, replace all instances of the package version within the files META-INF/vault/definition/.content.xml and META-INF/vault/properties.xml with a placeholder such as ‘PROJECT_VERSION’
Updating the POM
Finally, to get the package to install correctly, update two items in the package project pom.xml. First, add a plugin configuration for the maven-replacer-plugin to replace all instances of PROJECT_VERSION in the two files with the current version of the project:
<!-- Update the versions within the package configuration -->
<plugin>
	<groupId>com.google.code.maven-replacer-plugin</groupId>
	<artifactId>replacer</artifactId>
	<version>1.5.0</version>
	<executions>
		<execution>
			<phase>prepare-package</phase>
			<goals>
				<goal>replace</goal>
			</goals>
		</execution>
	</executions>
	<configuration>
		<includes>
			<include>target/classes/META-INF/vault/properties.xml</include>
			<include>target/classes/META-INF/vault/definition/.content.xml</include>
		</includes>
		<replacements>
			<replacement>
				<token>PROJECT_VERSION</token>
				<value>${project.version}</value>
			</replacement>
		</replacements>
	</configuration>
</plugin>
Finally, add the path variable into your cq-deploy-plugin configuration and configure it to be the path to the package underneath /etc/packages.
<plugin>
	<groupId>com.sixdimensions.wcm.cq</groupId>
	<artifactId>cq-deploy-plugin</artifactId>
	<executions>
		<execution>
			<id>install-package</id>
			<goals>
				<goal>install-package</goal>
			</goals>
		</execution>
	</executions>
	<configuration>
		<path>${project.parent.groupId}/${project.artifactId}-${project.version}.zip</path>
	</configuration>
</plugin>
In the example above I used variables from the project configuration, since they just so happened to work, but this will depend on where you want the package to be. Remember that the path must correspond to the configuration values for the name and group within the properties.xml and .content.xml. The path for the package will be: {PACKAGE_GROUP}/{PACKAGE_NAME}-{PACKAGE_VERSION}.zip
Once you have updated the path in your configuration, you will be able to install your package automatically using the CQ Deploy Plugin and see the updated metadata.